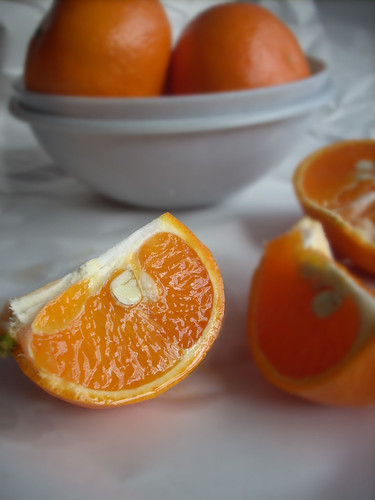
We are going to make this picture ..

.. look like this.
 Excited? Good!
1. The first step is to open up your photoshop program and go to File --> Open and browse for the picture you want to edit.
Quick tip: Choose a picture that is not just one item, but has a definite 'background' and an item in it that you want to 'highlight' while the rest of the picture is blurred. Something like the picture I have chosen.

The good news is, we are not going to use any of the scary-looking colourful stuff on the right hand side. I have no clue what you can do with those! Let's just concentrate on the left hand side, the long bar, the Tools Palette.
2. The next step is to choose the Brush Tool from the Tools Palette on the left.

3. Once you have chosen the brush tool, your mouse pointer will turn to a circle or a tiny dot. We need to adjust the size of this circle, or brush, by using the brush size setting on top. Just move the pointer to the right until you get a brush of the required size.
Quick tip: The size of the brush should be adjusted according to the area you want to blur. If its a big area, then choose a bigger brush size so that you can save time. If you are working with a bunch of tiny areas in the pic, then stick with a smaller brush size.

4. Now that we have a brush we can work with, the next step is to choose the area you want to blur. For that, you need to switch to the Quick Mask Mode. You will see two sqaures towards the bottom of the Tools Palette, click on the one on the right hand side.

5. Next, we need to select the area. Click and drag your mouse pointer over the area you want to blur making sure that you leave out the portion you want to highlight. I left out the slice of orange in the front and 'chose' the entire area outside of it. As you drag your pointer, the area will turn red so you can see what you are doing. The process is similar to using stuff on MS Paint.
Quick tip: if you accidentally highlight some portions you didn't mean to (like the top half orange slice in the front in my pic, for eg) use the 'eraser tool' to clear out the red highlight. You will find the eraser on the left hand side of the Tools Palette, 5th from top.
6. Once you have 'reddened' the entire region you want to blur, this is how it will look.

Now, go back to the Tools Palette and click on the square to the left of the Quick Mask Mode Button. This is get you back to the Standard Mode. Once you do this, you will see a dotted line around the area you don't want to blur. In my eg, its the orange slice, as below.

7. What this means is, the orange slice is selected as of now for the next edit that we peform. Since we want to blur the background and not the orange slice, we need to reverse the selection. Its ok if you find this confusing, just trust me and hold down CTRL+SHIFT+I.

Now you will see the dotted line shifted to the perimeter of the pic and also around the orange slice. This means we have selected everything except that slice to be worked on next.
8. Now that we have the entire background selected for Operation Blurring Background its a breeze from here.
Click on Filter --> Blur --> Gaussian Blur.

You will see a window appear where you can specify the amount of blur you want.

I have chosen 10 for the picture below.

Gaussian Blur - 103. Once you have chosen the brush tool, your mouse pointer will turn to a circle or a tiny dot. We need to adjust the size of this circle, or brush, by using the brush size setting on top. Just move the pointer to the right until you get a brush of the required size.
Quick tip: The size of the brush should be adjusted according to the area you want to blur. If its a big area, then choose a bigger brush size so that you can save time. If you are working with a bunch of tiny areas in the pic, then stick with a smaller brush size.
4. Now that we have a brush we can work with, the next step is to choose the area you want to blur. For that, you need to switch to the Quick Mask Mode. You will see two sqaures towards the bottom of the Tools Palette, click on the one on the right hand side.
5. Next, we need to select the area. Click and drag your mouse pointer over the area you want to blur making sure that you leave out the portion you want to highlight. I left out the slice of orange in the front and 'chose' the entire area outside of it. As you drag your pointer, the area will turn red so you can see what you are doing. The process is similar to using stuff on MS Paint.
Quick tip: if you accidentally highlight some portions you didn't mean to (like the top half orange slice in the front in my pic, for eg) use the 'eraser tool' to clear out the red highlight. You will find the eraser on the left hand side of the Tools Palette, 5th from top.
6. Once you have 'reddened' the entire region you want to blur, this is how it will look.
Now, go back to the Tools Palette and click on the square to the left of the Quick Mask Mode Button. This is get you back to the Standard Mode. Once you do this, you will see a dotted line around the area you don't want to blur. In my eg, its the orange slice, as below.
7. What this means is, the orange slice is selected as of now for the next edit that we peform. Since we want to blur the background and not the orange slice, we need to reverse the selection. Its ok if you find this confusing, just trust me and hold down CTRL+SHIFT+I.
Now you will see the dotted line shifted to the perimeter of the pic and also around the orange slice. This means we have selected everything except that slice to be worked on next.
8. Now that we have the entire background selected for Operation Blurring Background its a breeze from here.
Click on Filter --> Blur --> Gaussian Blur.
You will see a window appear where you can specify the amount of blur you want.
I have chosen 10 for the picture below.
For 10, its hard to see much difference so I have also tried 15 and 20 to illustrate the difference.
 Gaussian Blur - 15Gaussian Blur - 20
I'd probably go with 20 for this pic since that setting has highlighted the orange slice beautifully and made it look nice and crisp. I have never gone above 20 because I feel the picture may look too artificial beyond that.
9. Once you have chosen the blur amount you want and like what you see, go to File--> Save as --> and save your file.
10. You all set with a nice photograph!!!


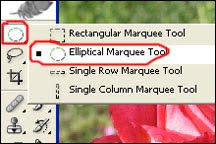
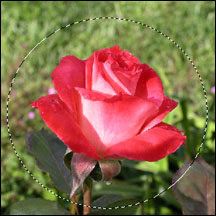
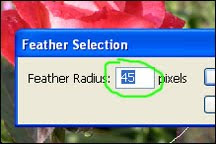
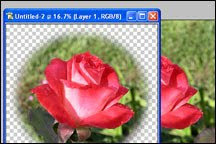
 This tutorial is to help you learn how to give a photo a soft edge. This technique is mainly used for collages, but it can also be used for displays, reports, or just to make a picture more pleasing to the eye. Once you have your photo open in photoshop: